
What Account Should a Windows Service Run As?
Best practice suggests that a given service running on a Windows host should be configured to logon as a dedicated account that has the minimum privileges required to do what the service is supposed to do. Windows has built in accounts that can be used as the principal for services (such as Local System, Local Service, Network Service, etc.) but some of these have elevated access to the local machine and so pose a risk if the service were to be compromized via some attack. You could create a dedicated local machine account to own the service but a more manageable option is to create a service account in the Windows domain. Windows Active Directory actually has special features to manage such domain service accounts including the ability to centrally manage passwords and to automatically change them on a configured schedule. Configuring such accounts involves several steps and there are some wrinkles along the way. I just went through this learning process and I wanted to document my experiences for future reference.
Creating and Configuring a Group Managed Service Account
I don’t believe that you can do all the following steps using the Windows UI. I did all of this using PowerShell.
The first thing to do is logon to a convenient Windows workstation/server that is a member of our domain using an account that has the appropriate admin access to create/configure objects in the domain. Next we need to start a PowerShell session (with elevated privileges) and install a few additional modules …
PS C:\Users\username> Import-Module ServerManager
PS C:\Users\username> Add-WindowsFeature RSAT-AD-PowerShell,RSAT-AD-AdminCenter
If this is the first time you are creating any group managed service accounts you will first have to generate a new root key for the Microsoft Group Key Distribution Service (KdsSvc), like so …
PS C:\Users\username> Add-KdsRootKey -EffectiveImmediately
For the purposes of this example let’s assume that we are creating a service account to own the SQL Server service instances that will be art of a new Availability Group. There will be three machines, two in a data center in NJ and one in a data center in CA; let’s call them sqlnj01, sqlnj02 and sqlca01. Collectively these will be part of an Availability Group that we will call ag01. So let’s call the service account sqlag01.
First we need to create a new security group to contain the names of these servers, the computers that will be allowed to use the group managed service account.
PS C:\Users\username> New-ADGroup `
>>> -Name grp-sqlag01 `
>>> -GroupCategory Security `
>>> -GroupScope Global `
>>> -Path "OU=Service Account Groups,OU=Groups,DC=MyCompany,DC=Com" `
>>> -Description "Computers for the gmsa-sqlag01 service account"
Note that we specified the OU where we want the group to live.
Next we add the relevant machine names to the group, like so …
PS C:\Users\username> Add-ADGroupMember -Identity grp-sqlag01 -Members sqlnj01$,sqlnj01$,sqlca01$
Note that you have to add the $ postfix to each machine name.
We can then check the group membership, like so …
PS C:\Users\username> Get-ADGroupMember -Identity grp-sqlag01
Next we create the service account, like so …
PS C:\Users\username> New-ADServiceAccount `
>>> -Name gmsa-sqlag01 `
>>> -DNSHostName gmsa-sqlag01.mycompany.com `
>>> -PrincipalsAllowedToRetrieveManagedPassword grp-sqlag01 `
>>> -Path "OU=Managed Service Accounts,DC=MyCompany,DC=Com"
Note that we specified the OU where we want the service account to live.
Installing a Group Managed Service Account on a Computer
Next we need to install the service account on the three machines where it is going to be used.
Note that if your environment consists of geographically distributed, replicated domain controllers, and you edited the group managed service account settings on a computer in a location far from the computer where you will be installing the service account, then you will have to wait until AD replication has brought the new settings to the domain controller closest to that computer before you execute the following. If any of the following commands raise an error just wait a while and try again.
We can install the service account from the machine where we have been working already, via PowerShell …
PS C:\Users\username> Enter-PSSession -ComputerName <hostname>
Or we can RDP to each machine in turn and start a PowerShell session (with elevated privileges). Either way we need to run this command on each machine …
PS C:\Users\username> Install-ADServiceAccount -Identity gmsa-sqlag01
Now, the above command could return an “Access denied” error. The basic problem is that Windows machines cache the
membership of AD security groups. If a machine has cached the membership of the grp-sqlag01 group from before its
name was added to the group, then when we try to install the new service account Windows will not know that the machine
is allowed to retrieve the managed password. Thus the “access denied” error.
Before we can install the new service account we need to get each machine to reread the associated security group
membership from AD. Some articles I found online said that to fix this you had to reboot the server. Now that will
work but it seems a little bit extreme, especially if you are trying to install the new service account on a production
server. There are better ways. One way is to wait. The cached local security groups will eventually time out. We
don’t have to wait though. With some help from
this article I learnt about the
klist command which is used
to list/manage currently cached Kerberos tickets. We can use this command to purge the tickets and by doing that we
also clear the locally cached security groups.
So we can run this …
PS C:\Users\username> klist -lh 0 -li 0x3e7 purge
And then rerun the above Install-ADServiceAccount command which should work. We can then test the installation using
…
PS C:\Users\username> Test-ADServiceAccount -Identity gmsa-sqlag01
… which should return True.
Configuring the SQL Server Service to Logon as the Service Account
By default, the SQL Server setup program will configure the SQL Server service to logon as a special virtual account called “NT Service\MSSQLSERVER”. In order to change this we need to launch the “Services” app on the machine, right click on the “SQL Server (MSSQLSERVER)” entry in the services list and then click on Properties. We click on the “Log On” tab and then click on the “Browse…” button to launch the “Select User or Service Account” dialog. We click on the “Locations…” button and change the option to “Entire Directory”; we click on the “Object Types…” button and ensure that “Service Accounts” is selected; and then we Enter “MyCompany\gmsa-sqlag01$” in the “Enter the object to select” text box. We click “Check Names” to verify that the account can be found and then we click the OK button to return to the “Log On” tab. We clear out the “Password” and “Confirm password” fields like so …
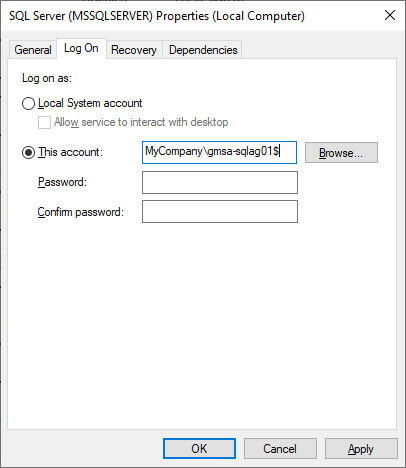
And then finally we click the “OK” button.
We should be informed that “The account MyCompany\gmsa-sqlag01$ has been granted the Log On As A Service right” and then then that “The new logon name will not take effect until you stop and restart the service”. Restarting the service is the final step.
We repeat this for the other machines in the group and we are done.
Service Dependencies
One consequence of having a service logon as a managed service account is that a domain controller must be accessible when the service starts up in order for Windows to retrieve the managed password from AD. This means that the network must be up and fully configured in order for a service to start. This makes sense but unfortuntelay it leads to a problem when a computer reboots since the Service Control Manager will likely try to start services before the network service is itself fully started. This will lead to “automatic” services failing to start after a reboot. Not good.
However, we can fix this by configuring service dependencies.
Run regedit.exe and then navigate to the HKEY_LOCAL_MACHINE\SYSTEM\CurrentControlSet\Services\ folder. Then open the folder for the service that you have configured to logon as a service account (in this example it was MSSQLSERVER) and look for a REG_MULTI_SZ key/value called DependOnService. Create it if it doesn’t already exist and then edit the value to add Win32Time and Netlogon with each value on a new line. Like this …
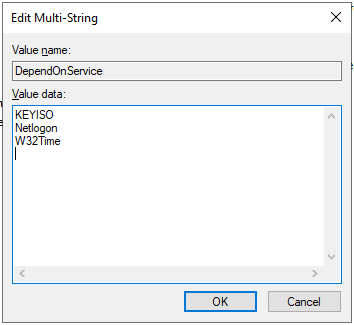
Click OK and then close regedit. With this done the Windows Service Control Manager will not try to start this service until the Netlogon and W32Time services are started which should ensure that AD is accessible.